Friday, January 10, 2014

Let There Be Light!

Whether you're a believer or not, pretty much everyone knows the story of God creating the heavens and earth. And that on the first day, God's very first order of business was to turn on the lights.

"And God said, “Let there be light,” and there was light.
God saw that the light was good . . ." (Genesis 1:3-4)

I happen to be a believer.  But even if I weren't, I'd still be convinced that Light Is Good -- particularly when it comes to selling a house.

Over the summer we were asked to consult on a home that had been on the market several months. It had been shown 35 times without so much as a nibble. The agent and client could not understand why the home had been on the market so long. And after viewing the online photos, we couldn't see the problem either. It was a fairly new home, all brick, great neighborhood, excellent schools, clean, neat, etc. It wasn't over-priced or strangely decorated. It was a truly great home.

The agent and owner theorized that the lack of granite in the kitchen was prohibiting offers, but we suspected the problem was something that we could not see in the online photos. Bad neighbors, cats, a smoker in the home -- you know, one of those things you hate to tell clients. 

We arrived fully expecting to be assaulted by the stench of cat pee, but there was nothing like that to be found. No eyesores next door, no smokers, nothing. The house was as clean and neat as the photos depicted. We were stumped.

We went room-to-room making minor furniture placement suggestions, but there were just no red flags. The only constant was that we kept saying, "You need more light in here." After about the fourth or fifth room, I asked the owner, "Is this how you show the home? Are the lights on or off when buyers visit?"  Well guess what...the lights were off and the blinds closed! Every time a potential buyer entered the home it was like they were stepping into a dungeon.

You could have knocked the agent over with a feather. I watched her mouth literally fall open, aghast at the fact that her client had been showing the home all summer without a single light on anywhere.

There is a reason why the winter causes people to be down and depressed. The grey and gloomy skies and cold temperatures cause a real condition known as SEASONAL AFFECTIVE DISORDER. It's no different when your home is shut off from light. A lack of light depresses buyers and prevents offers. Because of the lack of light throughout the home, buyers visiting our client's dreary home were essentially hit with temporary seasonal affective disorder.

In the case of our "in the dark" client, we told her to add lamps to every room and turn them on whenever the home was shown. She did and the house sold within a week.

If you're still skeptical, just take a look a the difference lights can make to the overall aesthetic of a room.

No lights, Blinds closed
See how blah that room looks with no lights on and the blinds closed? It's completely cold and dark. Nothing about that makes me want to go in and enjoy the space. Totally uninviting.


Lights on, Blinds open

Here's the same room with the lights on and blinds open. It's brighter, warmer and the beauty of the room shows. You see details in the accessories and the space of the room seems larger.

Lighting can really make a difference in your online photos too. The pictures above are totally amateurish (meaning they were taken by me). A professional photographer is trained how to use lighting to achieve the most beautiful photo possible. It's no secret. Lighting can make or break a first impression -- even online.

So if you do nothing else to prepare to sell your home, PLEASE....let there be light!

Friday, November 29, 2013

Trees, Turkeys, & Twin-size Sheets

Yesterday we hosted the whole family for Thanksgiving dinner. As most anyone who has ever hosted the meal of the year will tell you, there's a ton of prep work required before the first dish hits the table. Chief among the list of to-do's is cleaning. I keep my home fairly clean every day. But when it comes to special occasions, I always want to make things sparkle.

So before we fried three turkeys, baked two dishes of cornbread dressing, and one giant pan of homemade mac & cheese to go with all the other fixings, my husband and I cleaned the house from top to bottom. Steaming carpets, wiping baseboards, washing windows; we had enough stuff on our list to keep us busy for five full days. Despite our long list of chores, with less than 24 hours to Turkey Time, I decided to give our bedroom a mini-makeover.

I'm really terrible about remembering to take "Before" pictures of my own stuff. I always remember when we work with clients, but when it comes to my own projects I regularly drop the ball. Such is the case with my latest project. I had to wade through some really old photos to give you an idea what things looked like before we made changes on Wednesday.

Biggest Bradford pear trees ever!
The first "Before" picture shows the real impetus for this project. You see those giant Bradford pear trees? I had a hate-love relationship with those trees for many years. I hated the way they blocked the view of our home. And I hated the way that no matter how often we pruned them, whenever the slightest wind blew, a branch would usually fall off. Eventually strong winds relieved us of the hassle of regular prunings by taking them both completely down. That's when I discovered that I actually loved those trees because whenever the moon was full, they kept the piercing 3 AM moonlight from shining right into my eyes.

So let's take a look at my bedroom -- or at least what my bedroom looked like a few years ago.

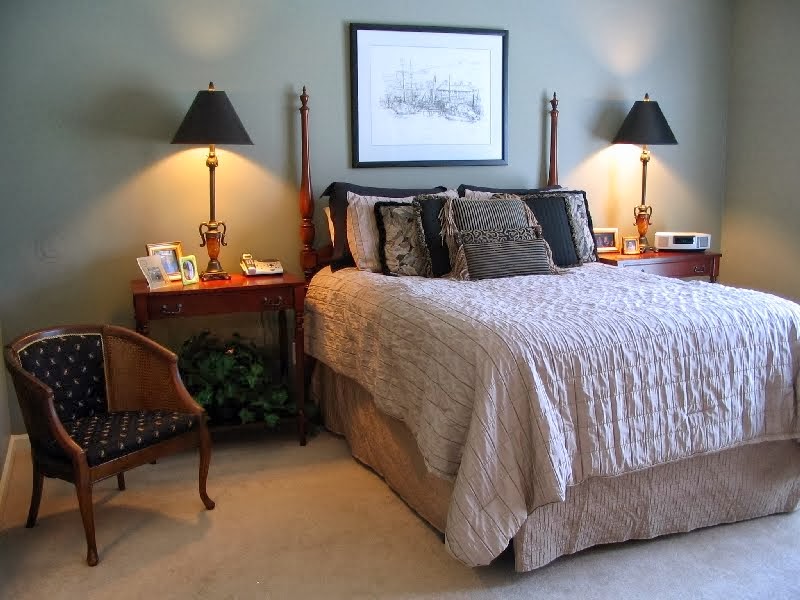
BEFORE - celery green walls, ornate bedding, sad little chair.
A year or so after the previous picture was made, we upgraded to a king-sized bed which required a new headboard, bedding, etc. I showed a glimpse of the new bed when I discussed how to properly make a bed. Here's how it looked just a few days ago . . .

King size bed w/dark frame & microfiber upholstered headboard
Now to the "AFTER" photos . . . Before you take a look, I need to reiterate that this is a mini-makeover. There is still plenty of changes to come like new lamps, art, and more. For now though, here's a look at phase one -- all accomplished on the Wednesday night before Thanksgiving.

Bedroom AFTER (Phase I)
First, we got rid of those celery green walls (Okay, I didn't do this step on Wednesday. That was done a few months ago). Next we painted, glazed, and distressed the headboard. Then we reupholstered it with a simple grey on white plaid fabric.

After upholstering the headboard, I had a little bit of fabric left. In fact, it was just enough to cover that sad little bedside chair. Looks a lot better now, huh?

Then the obvious change of adding simple, white bedding. So simple, but so impactful.

Then we attacked the primary problem of my bedroom -- covering that arched window that lets the full moon blind us on a monthly basis. Our ceilings are pretty tall (10 ft), so we needed extra long curtains. With the crown molding, we needed 110" panels to be exact. The problem though is that with less than 24 hours, finding ready-made 110" panels is next to impossible. So we opted for a pair of XL Twin-size flat bed sheets hung from cafe clips. And when the moon is full, you can bet we'll slide those bad boys across that arch and sleep like babies for the first time since the trees fell.


I'm really thankful that Grady approves of the changes. Nothing is worse than a grumpy schnauzer during the holidays!

Wednesday, June 12, 2013

Don't Pack Up The Personality

The first rule of preparing a home for sale is to DECLUTTER! I've said it here about a million times and I'm pretty confident that you've heard it elsewhere too. That's because along with deep cleaning, the best thing you can do to get your home ready to sell is to clear out the clutter. Unfortunately, some of you don't know when to stop.

When I tell you we deal in extremes, I am not kidding. Clients don't often ask for our help with neat, functional, and well-styled homes. When we get a call, it's usually to help cull a home owner who has gone too far; either by creating a hoarder's haven or decluttering themselves into total starkness.

Last week we helped out with a home that was full of extremes. For starters, the furniture was huge and the home wasn't. Although we don't typically label furniture as "clutter," the scale was such that it simply swallowed the space. Rooms appeared cluttered even though they were not. So we had to "declutter" the furniture to show off the true size of the rooms.

The biggest challenge we faced though, was that the home had been over-decluttered. In preparation for our arrival, the family had removed EVERYTHING except the furniture. They stored all pictures, art, accessories, and bedding -- all the things that make a home feel like a home. In an effort to declutter, they actually packed up the personality and the result was disastrous.

Living Room - BEFORE
Here you can see the living room as it was when we arrived. The furniture overwhelmed the space, hid the interesting shape and architecture of the room, and created a traffic flow nightmare. You cannot tell from the photo, but just behind the sofa is a wall and part of the kitchen counter. There was hardly any room to walk between the sofa and the wall/counter.

The other problem was that the room had no accessories or art of any kind to charm buyers. It was dull, unimpressive and B-O-R-I-N-G.  But look at it now; so much more spacious and inviting. To get this result, we merely removed one of the bulky end tables and that gargantuan entertainment unit. Then we moved the couch away from the wall and counter and shifted the chair to the other side of the room. But what brought the room to life was the addition of a few simple accessories.

Living Room - AFTER
Here's another angle. . . .
 
Living Room - BEFORE
And after . . .

Living Room - AFTER

 
In the bonus room, we thankfully didn't have to deal with removing huge pieces of furniture. Instead we found a long, empty, lackluster room. Once again, the personality had been packed away.

Bonus Room - BEFORE

Fortunately, we had some extra furniture on hand thanks to a mammoth workstation from the dining room. It worked so much better separated into two units in the bonus room. With a few pieces of art, a television, and a rug, buyers can now envision the room as real bonus.

Bonus Room - AFTER


Even injecting a little personality into often forgotten spaces like a powder room can offer big rewards. See how Plain Jane the powder room looked when we arrived . . .
 
Powder Room - BEFORE
Just adding two simple framed pictures, removing cleaning items, and closing the toilet lid made a substantial impact on the appeal of this bath.
 
Powder Room - AFTER
 
Bottom line: Decluttering is imperative to preparing your home for the real estate market. Just be sure that you don't declutter so much that you sacrifice your home's personality and appeal. Buyers need to be wooed. They have to fall in love with a home before they make an offer. Art, accessories, proper furniture scale and placement are the keys to getting a buyer say "I do."
 
We pumped up this home's personality with art and accessories and put the furniture on a diet. And by doing so, within two days the agent had received two full-price offers.

Wednesday, April 24, 2013

Put a Cork In It

As usual, I find myself with lots of little projects going on and very little time to blog about them. I didn't want to leave you hanging too long, so this hodgepodge of a post will just have to tide you over for a bit.

One thing I'm uber excited about showing off are our fabulous finds from an estate sale we visited on Friday. Normally we don't find many usable accessories for our staging business at such places because most people don't own big chunky accessories. And if they do, they very rarely get rid of them. To luck into a large, stylish/classic item is awesome. On Friday though, we found THREE! Take a look at what we got for less than the price of a Kimberly fern at Walmart . . .

 
It's difficult to grasp their scale from the photo, but the cloche is 14 inches tall. I didn't measure the obelisk, but I'm guessing it's about 28 inches.

Speaking of that cloche . . . the next time you see it, it will look completely different. Its total transformation is one of those little projects that's been keeping me too busy to write a real blog post.  So definitely check back in a few days to see how I bring it into the 21st Century.

Another project that I am working on is a "gift" of sorts for some of my readers. In the past year or so of touring lots of your homes, we've learned that one of the greatest decorating dilemmas for people is hanging art. Sounds crazy, right? I mean, what could be so hard about hanging art? From what we've seen out there though, a whole bunch of you are having trouble getting it right. That is why I am working on a primer for anyone troubled by scale, composition, color, pairing, grouping, and all the other trouble spots that befall would-be art lovers. I don't want to call it Hanging Art 101, but that's what it is. So stay tuned for that too!

Lastly, the folks over at my very favorite winery in the whole world, Chateau Montelena Winery, asked their Facebook followers what they do with their used wine corks. I've used old corks in a million different ways, but my favorite thing to do with them is this:

Memorable use for old corks
Whenever we have a dinner party, a celebration, or just get together with family and friends, I write the date and event on the cork(s) from the wine we share. Then I toss them "under glass" beneath my favorite cloche.  It is so much fun each year to go back through the corks and recall the good times.

Again, I apologize for this schizophrenic post. It went in a lot of directions, but hopefully you can find some useful information in there somewhere. If not, check back in the coming days to see the transformation of that old timey cloche and my primer on hanging art.

Tuesday, April 16, 2013

Ditch the Dumpy Drapes

Have you seen this photo tip?


Source
If you've spent any time at all on Pinterest, you've seen it. It makes the rounds at least once a week.

I'm convinced that the reason why it is so popular is because it is so true. I am also certain that the people pinning it are not doing so for themselves. They already know that hanging curtains high above the window offers the illusion of height and space to a room. Those who know want you to know it too. They keep offering you a kindly hint, but some of you refuse take it.

When readying a home for the real estate market, this issue is huge. I cannot count the number of times I've had to beg homeowners to ditch their dark, heavy, low-hung drapes because they do absolutely nothing to help a home feel open and spacious. In fact, the wrong drapes can make a room seem sloppy and downright depressing.

Take a look at this client's bonus room.

 
Those dark, heavy drapes break up the view in a bad way. They close off the light from the window and they make the room look short and squatty.
 
After some pretty serious groveling to get the homeowner to trust us, we convinced her to replace the drapes with light, gauzy panels hung at least a foot above the window. We promised her that it would lighten the room, give a neat appearance, and offer the illusion of added space. I think we delivered on our promise, don't you?


Wednesday, April 3, 2013

Your Slipcover Is Showing

I love slipcovered sofas . . . when they look like this:

Source
 And this:

Source
In our business, though, we rarely go into a home with slipcovered furniture that looks like those pictures. Generally when we run into slipcovered furniture, it looks like this:

Source
Furniture like that can be a BIG problem when you're trying to sell a home. A buyer who sees a room in this condition will usually do one of two things. They will leave thinking there is "no way I'll make an offer on that home. It's a mess." - OR - They will make a lowball offer because they don't believe the owners care much for the place.

The thing is, that room is actually pretty clean. So why does it look so dumpy? The furnishings are a bit dated, but even super dated rooms can show as clean and neat. Being of victim of old fashioned taste is not the issue here.

The problem lies with those sloppy sofas and droopy drapes. I believe the technical term for it is a "Hot Mess." When I first saw this photo I started looking around for painters, because it totally looks like there are drop cloths everywhere. The slipcovers do not fit properly and the dozens of pillows trying to camouflage the situation are only making matters worse.

In the past week, my business partner and I have been in two homes with slipcovered furniture eerily similar to the sloppy sofas above. BOTH times, the furniture being covered looked far better than what was being used to cover it. And each time the owners told us that the reason for the slipcover was that they'd gotten something on one of the cushions.

Folks, there are hundreds of products on the market to clean upholstery. If you don't feel like running out to the store, there are recipes on Pinterest for making your own with stuff you probably already have on hand like: rubbing alcohol, peroxide, vinegar, baking soda, etc. If that doesn't work for you either, there are companies that will come clean it for you. And if all else fails, flip the cushion over or drape a cute throw over it until you can afford a new sofa. No matter what, a discount slipcover should almost never be your fix.

The recent epidemic of sloppy slipcovers is not entirely the fault of homeowners. I lay most of the blame on the manufacturers who mass produce those "one size fits most" slipcovers. They are liars. The label should read "This probably won't fit your furniture, hardly any of them do." They should also include language like -- "WARNING: The contents of this bag will never look like the picture. Whatever blemish you are attempting to cover up will be magnified to eyesore status upon placement of this product." They should also warn purchasers that: "Once you spend two hours getting the product as close to resembling the picture as possible, sitting on it for even a millisecond will require another full hour of tucking, stretching, pulling, and more tucking."

So for goodness sakes, if you cannot find or afford perfectly fitting slipcovers with separate cushion covers, PLEASE, PLEASE, PLEASE do not just settle with whatever you find on the clearance shelf at Kmart. To get a custom look, you're going to have to get customized covers. It's as simple as that.

Wednesday, March 27, 2013

Magazine Clean

The very best thing you can do to get your home ready to sell is to clean it. A thorough cleaning gives buyers the impression that your home is well-maintained. And I promise that it will help your home stand out from the rest.

The definition of clean varies greatly from one person to the next. For some, cleaning means getting out a bunch of cleaning supplies and scrubbing every corner. Others think it means simply clearing the clutter from counters and other surfaces. My husband tries to make me believe that clean is when all your stuff is organized into neat stacks. Sorry Honey, but there's more to it.

When you list your home on the real estate market, your goal should be Southern Living. I don't mean you've got to put magnolias in all the rooms, I mean it needs to look like professional photographers are arriving any minute to shoot your home for the cover of a magazine. That means no cobwebs in the corners, no clothes on dressers, no shoes on the floor, no dust on the furniture, no fingerprints on the windows, no overflowing trashcans, no toilet bowl brushes sitting beside the toilet, no toothbrushes on the counters, no unmade beds, etc. If you wouldn't show it in a magazine, you don't want to show it to a buyer. 

Getting a home into a magazine-ready condition and keeping it that way is tough. I get it. But there are things you can do while your home is on the market to make it easier. Here's a step-by-step guide for how to turn your home into a COVER HOME.

Seven Steps to Magazine Clean

1. Start by thoroughly cleaning -- top to bottom. Get rid of cobwebs, fingerprints on doors, walls, and windows, stains, odors, dust, and grime. Wash things you rarely think about like baseboards and switch plates. Make sure all grout/caulk is spotless and in good repair. Once you've thoroughly cleaned it, then you can simply maintain it with vacuuming, dusting, etc. while it is on the market.

2. Replace dim or burned out bulbs. Use white bulbs; not clear ones. Clear bulbs give off terrible light. And definitely stay away from compact florescents. They take time to warm up. If a buyer has to wait for the bulb to reach full illumination, they may think something is wrong with the electrical system. It can send the wrong message, so just stay away from compact florescents when showing your home.

3. Keep all toiletries in a basket that can be quickly put away in a closet or cabinet prior to showings.

4. Keep the bath tasteful. I cannot stress this enough, but please do not leave plungers, toilet brushes, cleaners, extra rolls of toilet paper, etc. around in bathrooms.

5. Pick up your stuff. For the short few weeks or months that your home is on the market, make the decision to pickup after yourself.

6. Less is best. Keep accessories and appliances to a minimum. If you can put your toaster, can opener,  and/or blender under the counter, do so. And minimize your collections. It is far better to have one or two large accessories than a bunch of little things.

7. MAKE YOUR BED!!!!  For goodness sake, making your bed is the easiest thing to do to make a room look tidy. It takes five minutes. No excuses. Just do it.

I can't promise that Better Homes & Gardens will run over to snap a picture when you're finished, but I can promise that a clean house will sell far faster than a messy one. 


Take a look at these recent BEFORE & AFTER photos of a home we recently staged for sell. It was cleaned, cleared, and accessories and appliances were kept to a minimum. Just look what a difference it made . . .


BEFORE - Vanity Area
 
This area was big on clutter, small on personality. We had to address that, so we cleared the clutter by putting personal items in baskets and placing them in the closet and under the cabinets. Then we added a few simple accessories to give the area a neat and tidy appearance. Here's how it turned out . . .
AFTER - Vanity Area
 
BEFORE - Kitchen/Breakfast
 
The kitchen was overwhelmed by "stuff." Every surface had clutter of some kind. We started by hiding the food boxes on top of the fridge in baskets. Then we removed the harsh burgundy table cloth and softened the surface with neutral placemats and a basket of fruit. Finally, we cleared all non-essential appliances from the counters and added lamps to lighten up the dark spaces. Super easy fixes for such a dramatic change. Take a look . . .

AFTER - Kitchen/Breakfast