Wednesday, March 27, 2013

Magazine Clean

The very best thing you can do to get your home ready to sell is to clean it. A thorough cleaning gives buyers the impression that your home is well-maintained. And I promise that it will help your home stand out from the rest.

The definition of clean varies greatly from one person to the next. For some, cleaning means getting out a bunch of cleaning supplies and scrubbing every corner. Others think it means simply clearing the clutter from counters and other surfaces. My husband tries to make me believe that clean is when all your stuff is organized into neat stacks. Sorry Honey, but there's more to it.

When you list your home on the real estate market, your goal should be Southern Living. I don't mean you've got to put magnolias in all the rooms, I mean it needs to look like professional photographers are arriving any minute to shoot your home for the cover of a magazine. That means no cobwebs in the corners, no clothes on dressers, no shoes on the floor, no dust on the furniture, no fingerprints on the windows, no overflowing trashcans, no toilet bowl brushes sitting beside the toilet, no toothbrushes on the counters, no unmade beds, etc. If you wouldn't show it in a magazine, you don't want to show it to a buyer. 

Getting a home into a magazine-ready condition and keeping it that way is tough. I get it. But there are things you can do while your home is on the market to make it easier. Here's a step-by-step guide for how to turn your home into a COVER HOME.

Seven Steps to Magazine Clean

1. Start by thoroughly cleaning -- top to bottom. Get rid of cobwebs, fingerprints on doors, walls, and windows, stains, odors, dust, and grime. Wash things you rarely think about like baseboards and switch plates. Make sure all grout/caulk is spotless and in good repair. Once you've thoroughly cleaned it, then you can simply maintain it with vacuuming, dusting, etc. while it is on the market.

2. Replace dim or burned out bulbs. Use white bulbs; not clear ones. Clear bulbs give off terrible light. And definitely stay away from compact florescents. They take time to warm up. If a buyer has to wait for the bulb to reach full illumination, they may think something is wrong with the electrical system. It can send the wrong message, so just stay away from compact florescents when showing your home.

3. Keep all toiletries in a basket that can be quickly put away in a closet or cabinet prior to showings.

4. Keep the bath tasteful. I cannot stress this enough, but please do not leave plungers, toilet brushes, cleaners, extra rolls of toilet paper, etc. around in bathrooms.

5. Pick up your stuff. For the short few weeks or months that your home is on the market, make the decision to pickup after yourself.

6. Less is best. Keep accessories and appliances to a minimum. If you can put your toaster, can opener,  and/or blender under the counter, do so. And minimize your collections. It is far better to have one or two large accessories than a bunch of little things.

7. MAKE YOUR BED!!!!  For goodness sake, making your bed is the easiest thing to do to make a room look tidy. It takes five minutes. No excuses. Just do it.

I can't promise that Better Homes & Gardens will run over to snap a picture when you're finished, but I can promise that a clean house will sell far faster than a messy one. 


Take a look at these recent BEFORE & AFTER photos of a home we recently staged for sell. It was cleaned, cleared, and accessories and appliances were kept to a minimum. Just look what a difference it made . . .


BEFORE - Vanity Area
 
This area was big on clutter, small on personality. We had to address that, so we cleared the clutter by putting personal items in baskets and placing them in the closet and under the cabinets. Then we added a few simple accessories to give the area a neat and tidy appearance. Here's how it turned out . . .
AFTER - Vanity Area
 
BEFORE - Kitchen/Breakfast
 
The kitchen was overwhelmed by "stuff." Every surface had clutter of some kind. We started by hiding the food boxes on top of the fridge in baskets. Then we removed the harsh burgundy table cloth and softened the surface with neutral placemats and a basket of fruit. Finally, we cleared all non-essential appliances from the counters and added lamps to lighten up the dark spaces. Super easy fixes for such a dramatic change. Take a look . . .

AFTER - Kitchen/Breakfast


Monday, March 25, 2013

Pump Up the Personality

When we first entered this family room, it had no personality. It was a bland hodgepodge of mismatched furniture, poor scale, and clutter. Our mission was to pump up the personality of this room and turn it into an inviting, spacious, and comfortable place to relax.

Our first order of business was, as always, to advise the owners to DECLUTTER. Even though I see it day in and day out, I am still amazed at what a difference clean, clutter-free surfaces make to the appearance of a room.

BEFORE - Slip Covered Sofa Cut Off Flow of Room
Our second order of business was to do something about that bulky, slip-covered love seat. I did a really bad job of before pictures in this room, but you can see part of it in the photo from the kitchen. The owners were using a slipcover to hide a non-matching sofa that was in need of a minor repair. But their camouflage technique actually did just the opposite. It made the odd piece stand out even more. So we had them move the sofa to the basement (sans the slipcover), and add two new coordinating chairs. Doing this opened up the room and instantly made it seem more spacious and inviting.

BEFORE - Clutter Filled Family Room


The next thing we did was focus on the sofa. We did not add or remove a single item from the sofa, we merely fluffed and straightened the pillows. Which reminds me . . . if your style of living is such that you are not going to straighten and fluff pillows several times a day, then steer clear of furniture pieces that may need it. Instead, go for a sofa or chair with fixed cushions that do not require so much attention.

After straightening the sofa and adding new chairs, a rug was brought in that both softened and added interest to the room. We also added a console table under the television to help the balance. From there, it was just a matter of placing a few accessories and art of the proper scale in the room. I think the addition of the sailboat is my favorite accessory. I like its clean lines and simplicity; so different from the typical picture or mirror that you see all the time.

What made finishing this room especially great for us was how the husband reacted to the final design. He said that in a house full of women, he never got to have anything masculine in his home. He loved that we included "guys' stuff". And while this room is not particularly masculine, it illustrates how items like the sailboat and the world map on the wall can be worked into almost any design.

Take a look at how it turned out.

AFTER - Restyled Family Room
 
AFTER - Restyled Family Room

AFTER - Restyled Family Room
 
Stop by again tomorrow to see more Before & After photos from this project

Sunday, March 24, 2013

Why Hire a Stager?: A Dramatic Before & After

If I've said it once, I've said it a thousand times; yet it still bears repeating. . .The biggest factor in effective staging is getting the client to clean and declutter. I could say it until I'm blue in the face, but the photos don't lie. A neat and tidy appearance makes a huge impact on a room's appeal.

Take a look at the BEFORE photo of this teen's bedroom:

BEFORE
If you are a potential buyer, what do you see when you walk into this room? Did you notice the spaciousness of the room? 

Here's another view. Can you see the incredible view of the lake through that window?

BEFORE
Of course you said "NO". You're only seeing the unmade bed, piles of stuff, and an obstructed view, right?

It is so important to consult with a professional stager before you list your home because a professional stager will look at your property with a critical eye. They will tell you what a buyer is thinking when they view your property. Then they will work with you to develop a plan to restyle and improve the product that you are trying to market.

Our advice to this client? First -- clean and declutter. Next -- arrange furniture in a way that does not chop the room in half and prevent buyers from experiencing the true spaciousness of the room. And finally -- update the look with coordinated bedding and window treatments that don't bust the budget.

Here's how it turned out . . .

AFTER
 
We left the room with a well-coordinated, neat and tidy appearance. And look how much more spacious the room seems.

AFTER

And see . . . there REALLY is a lake out that window! 

Total cost for this dramatic restyling $91.00!!!  (Bedding - $40, Bedskirt - $12, Curtain panels - $20, New lampshade - $13, Chair rental - $4/mo, Garden stool rental - $2/mo.)

We hope you'll check back all this week for more before & after pictures of our latest project.

Friday, March 22, 2013

Bang The Drum Economically


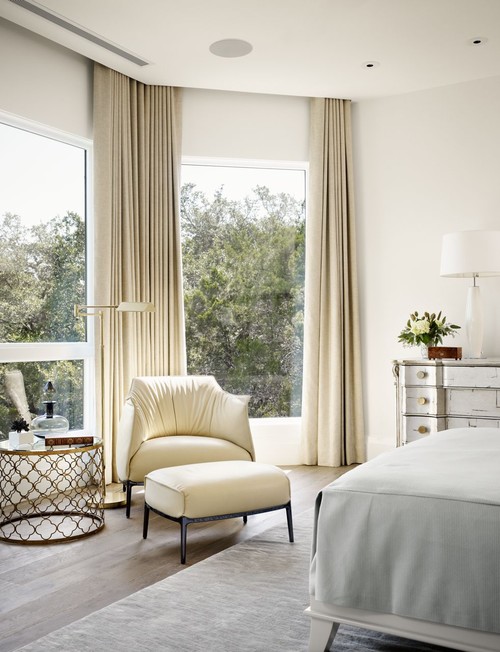
Have you seen these gold (or silver) drum tables? I just love them. The thing I like most about the wirey accent tables is that they don't close off a space the way a chunky chest or traditional end table does.  I also love them because they keep a room from looking so matchy-matchy.


Over the past year or so I've been shopping around for those stylish and unique items. And I've found that they are super easy to get if you've got $500 - $3000 to spend on an accent table. Which is pretty laughable because staging clients generally do not.

After searching for ages for an affordable drum table like the one in that picture above, I was really excited when my favorite design blogger, Stacy Curran, posted this one on her blog. It seemed like a great deal at just $231.


So you can imagine my shock when I went by Ross yesterday and found this one for just $39.99!!!


Yes you read that correctly. For just a few pennies over $40 you can have the look of a designer-inspired room like the ones featured in Architectural Digest, House Beautiful, etc.  And in our business it is imperative to replicate those designer looks for bargain prices. So don't fret. It is totally true that with just a little extra searching, you CAN achieve a great look without busting your budget.


Monday, March 18, 2013

Don't Wait. E-Decorate!


My friend is changing up her den/living area and asked for some design advice. Her request comes at an interesting time as we have recently been dabbling in the possibilities of e-decorating.

The concept of e-decorating or virtual decorating is nothing new, but we never delved into it because it didn't seem related to home staging. After all, staging and restyling requires rolling up your sleeves and getting your hands on things. We have found, though, that many of our clients can actually benefit from some virtual services.

Often after we have worked with a client to stage their home for sale, they call back asking for help with arranging furniture and accessories in their new home. Trouble is, those clients have sometimes moved hours away, making hands-on designing a tough task. That's where our e-decorating services can help.

Let's use the example of my friend who asked for design advice. She lives about 45 minutes from us. Sure we could hop in the car and drive over there, but there's really no need. We have seen the space. We understand her style and needs. Now we can help her via design boards, layout plans, and shopping lists. Very simply, we layout the room, advising her on what types of items to fill it with, and she does the rest.

Take a look at her Before & After layouts and new room design board.
From the layout above, you can see that the biggest issue with her furniture arrangement is that the sofa is impeding the traffic flow from the room entry at left, to the stairs (the bottom step is visible in the lower right corner). What is not easily understood from the layout however, is the scale of the furniture in the room. The sofas are large and very deep. They are super comfortable and great for snuggling up with a good book or to watch television, but they are not great for the size of the room. They are really bulky for the room's small scale.

A second problem with the room's current arrangement is due to the television being mounted above the fireplace. Normally, I love when televisions are mounted over a fireplace because they make great use of otherwise unusable space. What makes this particular situation problematic is two-fold. First, seating opposite the fireplace/television in this room does not work because it impedes traffic flow and congests the room. Second, the owners have several boxy components attached to the television with lots of wires. You cannot see it in the layout, but wires from the television are forced to hang from the wall over to the media cabinet located beside the sofa. 


In the new layout, we relocated the television to the wall where the large sofa had been. Beneath it, we placed a console table with a shelf for media components, if needed.  We also placed two upholstered ottomans under the table for overflow seating. What you cannot see from the layout, though, is the closet behind the television's new location. It could potentially be used for media component storage to keep gadgets and wires hidden completely from sight. So this new arrangement gives two long-term possibilities for media storage. 

We added a rug to anchor the room and suggested using three different types of side tables -- round, a chest, and nesting tables or a garden stool -- to add interest and texture. Our friend was also particularly interested in having a set of recliners, so we suggested a pair that looks like club chairs, but offers a hidden reclining feature; keeping with a more tailored style in the new room.

We did not include a coffee table in the layout because that decision should be made only after all other items have been placed in the space. The room is fairly small, so the scale of other furniture items could make it so that a coffee table would overwhelm the space. Sometimes, it is best to just "wait and see" on such items.
 
Once we developed the new layout, we needed to give our friend some ideas for the new "look" of her space. This is what we suggested:


You can see we provided suggestions for wall color, fabric colors, rug colors, leather options, art, lamps, and occasional furniture. These suggestions are comfortable, classic and coordinate well with the rest of her home. Of course she does not have to follow these ideas exactly, this is simply to serve as a guide for the types and colors of items she can use to fill her redesigned space.

If you are interested in taking advantage of the possibilities of e-design services, we would love to help! Just click here to CONTACT US.