Thursday, March 20, 2014

Bring It On!

It happened again! Another client called needing our help with a vacant home. Only this time, the home isn't really what I'd call vacant. In fact, I can think of plenty descriptive terms for it, but vacant isn't one. I guess I'd call this home a challenge, but that's not quite right either. It's more like -- Our Biggest Challenge Ever!
 
So here's the deal: The owners built another home nearby and moved into it months ago. Their new home is completely furnished and decorated. All the stuff remaining in this "vacant" home is what they didn't need or want in the new home. Some rooms are just as they were the day the family moved out, others are full of boxes and unwanted items.
Our challenge
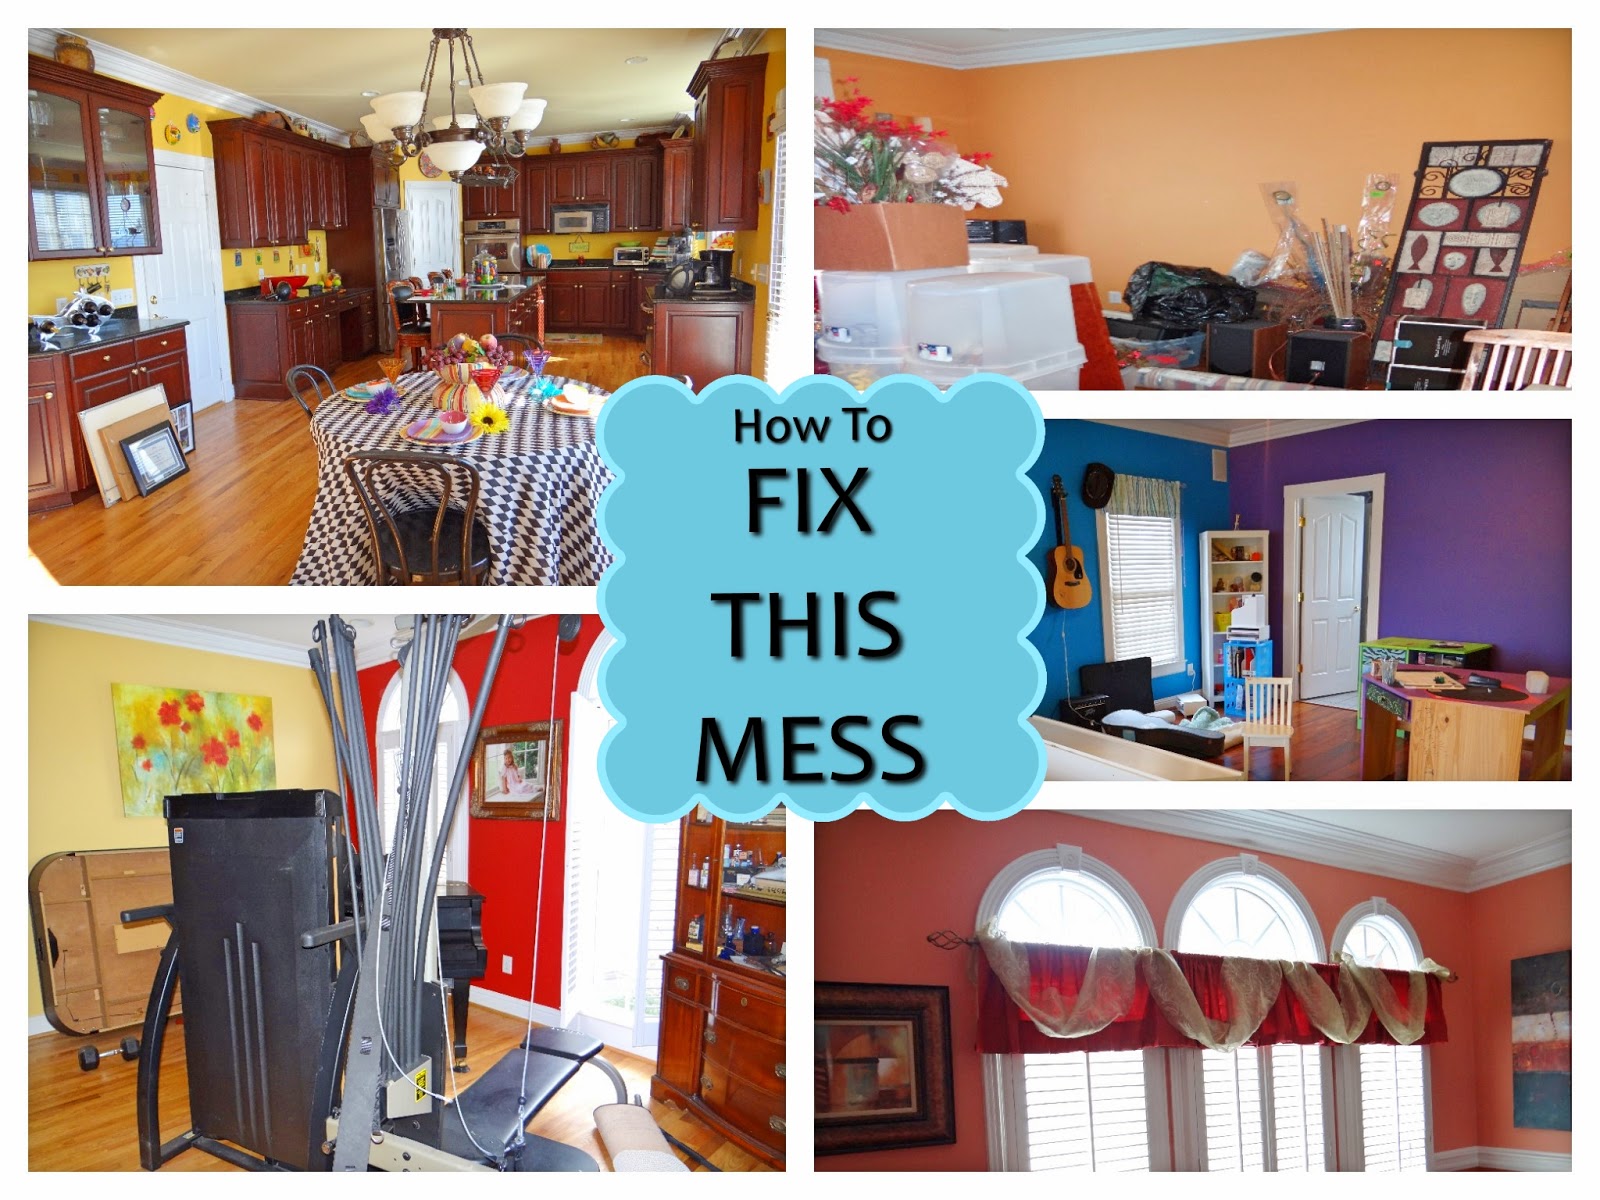
The challenge was to take all that stuff - a hodgepodge of unbelievably bright colors, mismatched furniture, and unusual accessories -- and turn it into a look befitting a million dollar lakefront listing. Did I mention that we had to do so without painting a single wall or adding any staging accessories whatsoever?  We said - BRING IT ON!
 
Our first room to tackle was the kitchen. Essentially, it remained in exactly the same condition as the day they moved out. With uber bright yellow walls and massive amounts of kitsch tacked to every surface, the look just wasn't working. So we removed nearly everything. Then we staged it with only simple, solid colored, and neutral items to counterbalance the strong wall color.


One more thing about the kitchen & breakfast area that I must mention is the tablecloth. Wow! It's something, isn't it? Normally we'd just remove it and move on to the next thing, but in this case that solution wasn't possible. The owners took the kitchen table with them when they left. What you see now is their somewhat clever attempt to disguise a folding table as a kitchen table.
 
Like I said, our initial thought was to just remove the hotspot altogether, but without the table beneath, the low-hanging chandelier would be a hazard to prospective buyers touring the property. The table had to remain. We scoured every inch of the home seeking an alternative to the harsh harlequin pattern on the tablecloth. The best we could do to neutralize it was to throw a solid café square over it. It's not ideal, but it is certainly easier on the eyes.
 
Like the kitchen, the living room presented similar issues -- bright colors & lots of knick knacks. We also had to cope with clutter and furniture placement problems. The room itself was also a challenge. Essentially we had a big room, big furniture, but very little wall space. Floating the large sofa between the columns or facing the windows was considered, but we ultimately decided against that option because showing off the space was top priority. In the end, we positioned the recliner near the sofa, offering buyers a fully open living area. Take a look . . .


The dining room was my favorite transformation of the day. First we removed the all of the clutter blocking the entrance to the room and that heavy, light-thieving valance. Next we separated and moved the oddly paired bookcase ends that were hiding the alcove. From there we moved on to decluttering and editing accessories. We also placed all the chairs around the table to eliminate the number of items scattered about the room. But what made the room spring to life was adding that gorgeous piece of statement art under the recessed spotlights in the alcove. The result is amazing!


In this bath, we were once again faced with the unchangeable yellow wall color. Actually the color can be great when the art and accessories work in its favor, but when accessories are in such an abundance that your eyes dart back and forth from accessory to color, it can overwhelm the senses. To make a really saturated wall color work, it is best to let the color be the accessory. Keep everything else soft and simple.


The master bedroom and bath was another of my favorite changes of this project. When we arrived the master suite was a narrow alleyway chopped in half by a dated, and very odd fireplace. Leaving the room empty was NOT an option because you CANT. STOP. STARING. AT. THE. FIREPLACE.
 
Near the master suite we noticed a very small bedroom that was crammed full of furniture. We decided that it would be far better for a small bedroom to sit empty than the master suite. So we borrowed from the small bedroom to show off the potential of the master.
 
Take a look at the Master Suite transformation sponsored by a neighboring bedroom . . .


Just as we did in other rooms, we addressed the issue of bright paint and kitsch in the master bath by decluttering, editing, and adding some powerful & coordinated art. The changes make for a much more pleasing appearance.


Thursday, March 13, 2014

Saved by Pinterest

From the moment Pinterest users began wowing us with upcycles and chalk paint projects, dump-worthy junk items have been counting their lucky stars. Pinterest has single-handedly helped save millions of laminate furniture pieces, tattered old chairs, ugly chandeliers, and wood pallets from a trash heap fate.

Pinterest has inspired me to save and reuse items I would otherwise have thrown to the trash too. Just last week I gave new life to three things I would have set to the curb in the past. Just look at these things . . .


Would you have bothered saving them? Probably not. They're pretty ugly. My husband thought they were junk. When I dragged a giant tarp to the driveway and laid out materials to resurrect them, he was sure I wasting my time. But I told him not to worry. "I saw how to do this on Pinterest!"

Well, take a look at them now . . .


Gone are the horrendous red mats and ugly laminate wood grain. Now they're light, bright, and full of life!

Obviously the bookcase got a couple doses of pale turquoise paint. But the John Haymsen prints of Williamsburg landmarks are my favorite transformation. By painting the mat in a softer color, the old prints have a new lease on life.

Now I'm sure plenty of you are wondering how I painted that laminate or those mats. Well, wonder no more. Here's what I did. . .

Painting a Laminate Bookcase


1. You need to "rough up" the surface to help the paint adhear long-term. Even if you're planning to use a paint that says no sanding required, it's better to just go ahead and do this step. The trouble with laminate, though, is that if you sand it, the surface will come off and you'll be left with particle board. Yuck! So in this case, I used a chemical deglosser. There are lots of products on the market like Liquid Sander and such. Just visit your local Lowes, Home Depot, or Ace Hardware. They're sure to have it. One word of caution: Don't tell the little old guy in the store that you're planning to use it on laminate furniture. He'll tell you can't paint laminate.

2. Rub the deglosser on every nook and cranny of the piece you want to paint. Remember to use gloves and do it outdoors where there's lots of fresh air. The stuff stinks. After you've covered every inch with deglosser, it's time to sit and wait. It takes at least 30 minutes for the deglosser to work its magic. In about an hour your item should look like its been covered by a white haze. That's what you want.

3. When you see the white haze, start painting. I strongly recommend that you use a chalk paint for the best adhesion long-term. I know they're more expensive, but Annie Sloane paints are the best. Once it's dry, enhance and protect it with wax. Clear, dark, or tinted - whatever you like.


Painting a Picture Mat


1. The hardest part of changing the color of a mat is disassembling/reassembling the picture -- especially if it was professionally framed. So your first step is to remove the dust cover (a.k.a. the brown paper on the back of the picture.)

2. With the dust cover removed you can now see how the frame is constructed. Is it held together with frame clips, brads, staples, or nails? In the case of these old prints, the framer used staples to hold the backing, print, mat, and glass in place. Whatever has been used, you'll need to either remove or bend it back. Because staples were containing my prints, I just bent them back with a flat head screwdriver.


3. Once you have access to the contents of the frame, begin removing each layer and set them aside. You will likely need to remove the print from the mat, so be very careful. Prints, especially old ones, tear easily. Go slowly.

4. When you have removed the mat, it's time to start painting it. Using a small, smooth FOAM roller, roll on any color craft paint you like. Be sure to use long, even strokes to prevent streaks.

5. Allow it to dry fully. Then give it a 2nd coat of paint using the same long, even strokes as before.

6. When your mat has 2 coats and is completely dry (at least 24 hours), you can start reassembling the frame.

7. First mount your art piece to the back of the newly painted mat. I used a simple clear tape on the back of the print to secure it to the mat.

7. Next clean the glass and frame using a lint-free cloth and Windex. Be extra careful not to smudge or get debris trapped on the inside of the glass. When it's clean and clear, lay the glass inside the frame

8. Stack the mat, art, and any backer boards to fill the frame completely. Then resecure the contents either by bending the staples, brads, or nails back in place or by replacing the frame clips. If you break a frame clip or need new brads, you can purchase them at most craft stores.

9. Now, replace the dust cover. In the frame section of your favorite craft store you can purchase brown craft paper that is the appropriate weight for this purpose. Attach it using a simple double-sided tape.

10. Finally, reattach or replace the wire to the frame and hang your new art.


Wednesday, March 12, 2014

No Vacancy


Y'all are going to be so proud of me. Remember how horrible I claimed to be about remembering to take Before After photos of our projects? Well this weekend I finally remembered. I captured the before & after of everything -- even projects within projects. (I so rock!)

The project this weekend was yet another vacant house . . . sigh. And not just some itty bitty vacant shack. This home is huge! We're talking more than 5,000 square feet of empty. Well, I say it's empty.  The owners left two beds to sleep in when they visit, but unfortunately they left nothing else. So the gigantic empty house with two lone beds shows like a flop house -- a look that just wows potential buyers.

This lonely little bed is sure to wow buyers . . . NOT!
The focus for this project was twofold. First, the property desperately needed an injection of life and light into the huge empty space. With no one around to turn on lights, open blinds, and set the stage for buyers, this was going tough. Secondly, those beds really needed to convey a less lonesome look. The depressing sight was sure to leave buyers with negative feelings about the property, so that problem had to be rectified. 

An easy fix would be to haul in a bunch of rental furniture to solve the problem. Unfortunately the budget for this project was nowhere near being large enough to furnish a 5,000+ sq. ft. house with rental furniture. In this case, we needed to stick to the important spaces -- kitchens & baths, and focal points like the amazing architecture in the great room, and correcting trouble spots like the beds. Our affordable solution: Key Area Staging.

I've talked about Key Area Staging many times before, but it really is a great solution for giving buyers a positive impression of a vacant property. Logically, a vacant home should be the easiest for buyers to envision themselves living. With no furniture or personal items to detract or confuse them, buyers should be able to picture their belongings in the space. Historically, though, that is not the case. Buyers have much more trouble imagining their stuff and getting a positive feeling from vacant properties than they do with an occupied home.

Here's how we helped give buyers an idea of this vacant home's full potential . . .

Great Room - BEFORE
This great room was showing, well, not so great. Without furniture, pumping up the personality of the unusually shaped room was tricky. It couldn't be overdone, but clearly it needed something to accentuate the amazing architecture.


Great Room - AFTER
Adding a large gallery-wrapped oil painting, a basket with a neutral throw, and some decorative accessories invite buyers now to look up from the bland fireplace and notice the interesting lines of the room. Here's the view buyers get when they enter the room . . .

Great Room - AFTER

In the kitchen we struggled with low light, lots of continuous bland colors, and very few areas available for pizazz-injecting accessories.

Kitchen - BEFORE
Because the cabinets were low and continuous, we had to make sure that accessories packed a punch. Everything we added had bright colors; increasing the elements of light in the room.

Kitchen - AFTER
In the cooktop area, the issue of low light was especially noticeable. Even more vexing was the unusual angles of the space. The unconventional design could easily be a negative to buyers.

Kitchen - BEFORE
We had to show off the amazing potential of the cooktop area. To do hat we added dramatic accessories that displayed the space and offered light -- even when the lights were off. We settled on a large, silver platter on a stand to reflect light and show off the countertop capacity. Take a look . . .

Kitchen - AFTER
The round shape of the accessories soften the harsh angles, while the light, reflective colors add light to an otherwise dark area. Just look how much space there is. It certainly shows off the potential much better than the dinky little candle set in the Before picture.

The hall bath is my favorite transformation in this home. Here's how it looked when we arrived . . .

Bath - BEFORE
 
Bath - BEFORE
That printed shower curtain with the birds & butterflies kinda screams, "Your grandmother should live here!" So look people, the deal on baths when selling a home is that buyers are looking for spa-like baths. That means simple accessories and white linens. Save the printed stuff for your next place. When you're selling a home, plain white in the bath is best.

Bath - AFTER
 
Bath - AFTER
See how the white shower curtain, white rolled towels, and a closed toilet lid help the bath to show much more fresh and clean.

Now for Sad Bedroom #1 -- As you know, when we arrived the bedroom looked like this . . .

Bedroom - BEFORE
What you really can't see from the photo is the size of the room. The room is actually quite large for a secondary bedroom. But with the sad little twin pushed up against the wall, the room looks small and shabby. As for that black, depression-inducing bedding -- ugh! I don't even want to talk about it. This room needed help.

Bedroom - AFTER
We could not completely furnish the room to show off its size, but with a few accessories we were able to give buyers an idea of the room's potential. The addition of large, brightly colored art, a big pop of color from the bookcase, light-injecting accessories, and a pale blue pillow eliminate the depressing feel and show off how great the room can be.

The master bedroom, a.k.a. Sad Bedroom #2, was nearly as depressing as the Bedroom #1, but not quite. We still had to cope with the same obstacles -- lots of space and a very small budget. Here's what we had to work with . . .

Master - BEFORE
Like Bedroom #1, we added a bedside table for a big pop of color, large art, and accessories. Another thing we did to make this master show like a master should was to tidy up the bedding. The comforter was ill-fitting and messy -- not a good image to convey to buyers. We removed some pillows and reduced patterns for a well-kept appearance. Take a look . . .
 
Master - AFTER
In the master bath we were challenged with an unconventional layout. The bathtub looks lost off to itself.

Master Bath - BEFORE

Master Bath - BEFORE
To remedy the problem, we added some accessories and art to fill the vacancies and add life to the bland, monochromatic room.

Master Bath - AFTER

Master Bath - AFTER

Finally, there was one more bath that needed our attention. Like the others, it lacked personality and light.

Bath - BEFORE

Bath - BEFORE
This room was not on our original to-do list, but we hated to leave it as-is. So we scraped together a few accessories to give it a more impactful presence. We swapped out the busy shower curtain with a more subdued one found elsewhere in the home. Then we used coordinating linens (which we also found) and some light-colored accessories on the counter. For a last-minute project, I think it turned out great.
 
Bath - AFTER
 
Bath - AFTER

If you have a vacant home that needs a personality pump-up, consider Key Area Staging. It's a great way to inject light & life in an otherwise dark and dreary space.